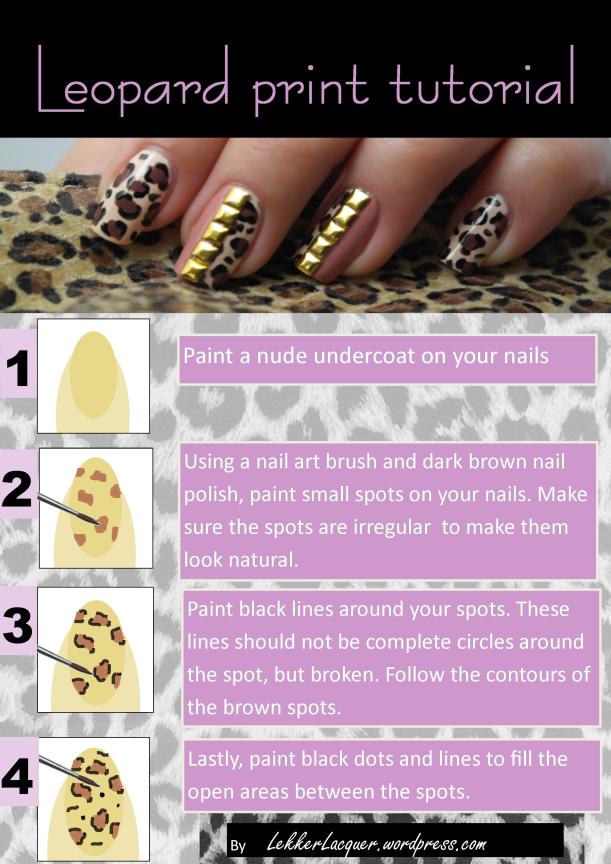
I’m so happy that leopard print is back, because I love it! Also, thank goodness it’s really easy to create your own leopard print nails. The great thing with leopard print is that it never has to be 100% perfect.. The more irregular the shapes, the better it looks. So… Here’s a step-by-step tutorial how to do leopard print nails:
Step 1:
Choose your undercoat color and paint your undercoat. I used the natural colours because I wanted to do two accent nails to spruce it up a bit. So, I used a nude from Missha. For my accent nails I painted half nude and half burnt pink (Missha). But you don’t have to do accent nails.
Step 2:
Use your second colour to create random irregular shapes on your nail. I try to keep all the “blobs” about the same size, but some are long and thin while others are round and fatter. I used a nail art brush, but you could also use a dotting tool. I prefer to make these dots smaller and do more. Other people sometimes do larger blobs and fewer. I used OPI “Wooden Shoe Like to Know” for this step.
Remember: keep a bit of space between each for the third colour and don’t stress if it doesn’t look like much yet.
Step 3:
If you are not doing an accent nail, then this will be your final step. Using a small paint brush or nail art brush paint black around your brown blobs. For this step, DON’T just make a perfect black ring around your brown. The black lines should be broken. Also, they can follow the contours of your irregular blobs.
If you have large spaces between leopard print dots, you can use your black to draw short lines and dots. This will fill up the space and complete the look.
Step 4: Accent Nails
For my accent nails (ring and middle fingers) I only did the leopard print on the nude half of the nails. The burnt pink I left blank. Then, down the dividing line in the center of each nail I stuck gold square metal studs. I really like the effect this creates.
Finally, remember to put a top coat on. And that’s it!
You can go wild (excuse the pun) with leopard print 🙂 Check out some other ideas for leopard print that I was playing around with on my nail wheel.
I’m having so much fun on my nail wheels, I don’t know why I didn’t get them sooner! I hope you like them.. Which is your favorite? 🙂


